Solutions Studio
Getting around in the Solutions Studio
The Solutions Studio is where your solutions, and the modules they contain, are created and maintained. It includes the graphical no-code interface where makers create individual flows for their end-to-end process. It's also where you can customize workspace apps to meet the unique needs of your organization.
The Solutions Studio is built around the philosophy of enabling business experts to define and maintain business logic without needing to concern themselves with technical nuances around programming syntax, constructs, or best practices. Instead, Tonkean abstracts these away and handles many of them automatically.
By default, the Solutions Studio displays the solution Overview and Business Outcome sections, which help keep your team aligned and moving in the right direction as they customize and update the solution. In the Process panel on the left, you can access the solution sections, which contain your modules, and the workspace app pages. On the right side of the screen are a visualization of your overall business process in the Process Mapping section and highlights of the important people for this particular solution.
Solutions Studio Common Elements
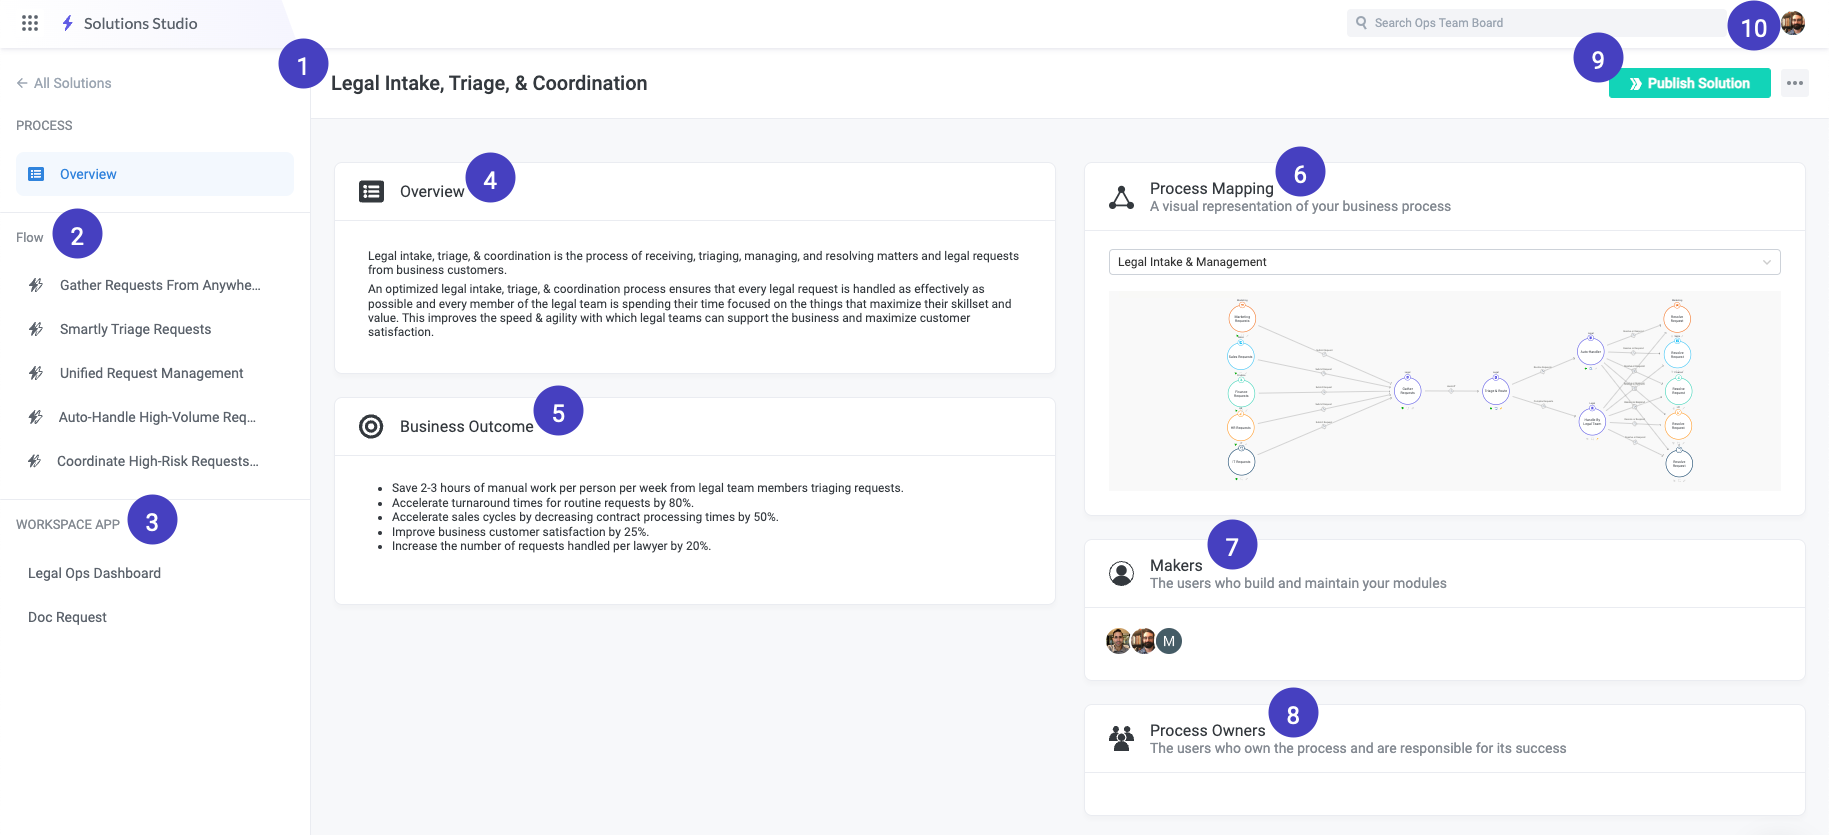
Solution name - A descriptive name for the solution that encompasses all of its parts.
Flow - The solution modules, categorized into one or more sections that help organize your most complex processes for easy readability. Each section contains related modules that are dedicated to a different aspect of the overall solution. Select Flow or a solution section to view and open the modules in that section.
Workspace App - The workspace app, separated into pages. The workspace app is a user experience for the solution, comprised of one or more pages that provide direct access to relevant solution information or important module actions. Select Workspace App or a workspace app page to access and edit a page.
Solution Overview - The high-level description of the solution, potentially including the general workflow and the applications or systems used. Writing this description is an important part of the solution-creation process.
Business Outcome - The target business outcome for the solution—that is, what the solution aims to accomplish and how the solution helps the organization. The best practice for this section is to include the key performance indicators and metrics you want to improve with the solution. Writing the business outcome is an important part of the solution-creation process.
Process Mapping - One or more process maps for your solution. Process maps are visual representations of your process, including the various teams and stakeholders, as well as the relationship between them.
Makers - The users that customize and maintain solution modules, as opposed to process contributors, who play an important role in the business process but do not have access to the module builder.
Process Owners - The users that own the business process contained with the solution. Process owners are specific to your business process, but do not have unique permissions or privileges in Tonkean.
Publish Solution button - Select this button to publish the most recent version of the solution, moving it from Build to Production.
Profile icon - Select this icon to view and update settings, invite users to your board, and access help and documentation.
Module Builder Common Elements
The module builder screen is where you'll spend most of your time in Tonkean. It reads left to right, much like a flowchart. This structure reflects the multiple conditions and paths (or branches) that many business processes have, allowing you to quickly visualize and understand the overall flow and relationships. However, it's important to understand that modules are not static decision trees; they are state-based, always monitoring the intake source and responding in real time.
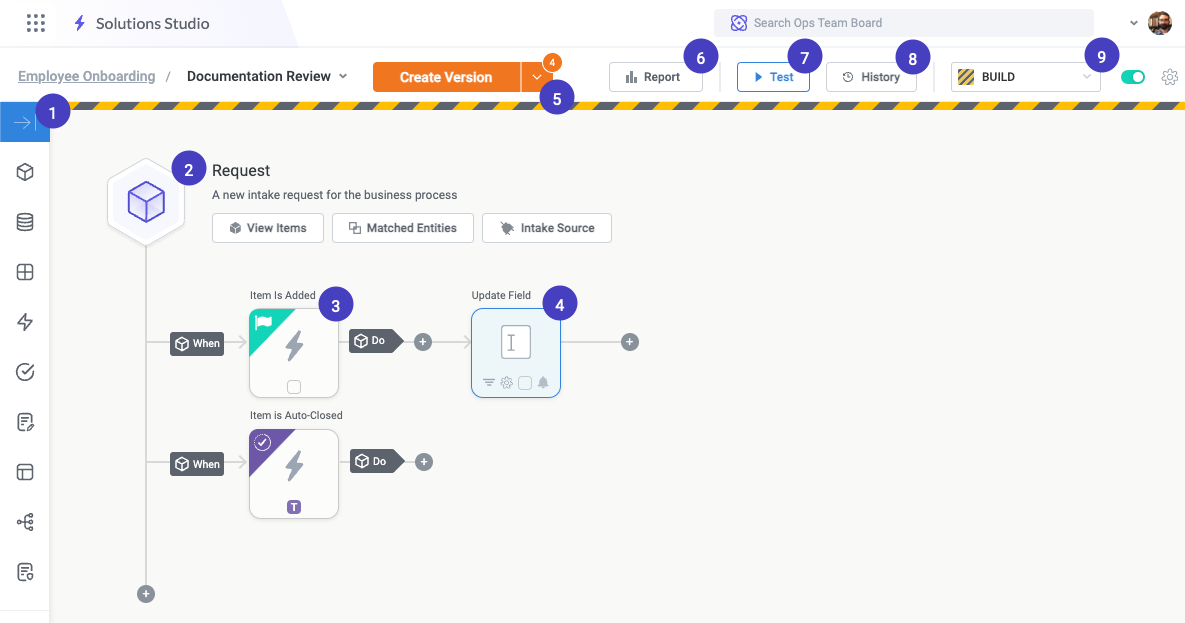
Module builder toolbar - These tabs provide access to the main elements needed to customize a workflow in the module builder, such as fields, items, and forms.
Intake source and request - The source from which the module is bringing in items. Common intake sources include email, chat, forms, or external data sources like Salesforce, Google Drive, or Ironclad.
Trigger - A "when" statement that defines when an action occurs.
Action - A piece of logic or behavior, represented as an action block.
Create Version - Create a new version of the current module workflow, saving it as a state you can revert back to.
Business Report - View the business report for this module.
Test Module - Test the module workflow using a new test item or an existing item.
Module History - View the Module Event History screen.
Environment picker - Select either Build or Production environments.
Module Builder Toolbar
The module builder toolbar is where you create and access the important objects in your module workflow, for example, fields, forms, and interfaces. You can even define the module item in the module builder toolbar. See below for a quick reference of each button on the toolbar:
Toolbar tab | Description |
|---|---|
Item Details  | Set the item's name, description, and requester. Also, select and configure the intake source for the module. |
Items  | View representations of the items in your module, including the root item and inner items. |
Fields  | Add fields of all types to your module workflow. Fields contain the individual pieces of data that are created and updated in your business process. For example, an item created from an email contains fields like "Sender" and "Subject." |
Triggers  | Create and view module logic in an outline format. Select the Add logic, +, button to add new action blocks. |
Statuses  | Add, edit, and customize statuses for your module. Statuses are powerful tools that help categorize requests as they move through a workflow and can also be used as conditions to trigger additional logic. |
Forms  | Add and configure both create and update forms for your module. Forms are one of the most popular ways to get data into your module. |
Interfaces  | Add and edit custom item interfaces. Custom item interfaces allow you to create unique, specialized views of the items in a given module, enabling the sharing of relevant information with the people involved in your business process. |
Process Maps  | Add and edit process maps. Process maps are responsive maps of your business process. They can be detailed and expansive, covering your entire process and sub-processes end-to-end, or they can provide an overview that keeps things simple for requesters. |
Contract  | Create a field contract. A field contract defines the inputs and outputs for this module, simplifying how consumers of the business logic can interact with it. |
Data Source Connectors  | View and access the data sources used by this specific module. You can also select the main nav icon, |
Versions  | View all versions of your module. Select a version to view that version as a snapshot in the module builder canvas. |
Auto Check-Ins  | Enable auto check-ins, where Tonkean uses due dates, ETAs, and data anomalies to automatically reach out to process stakeholders as needed to keep your process on track. |
